

How to get rid of reflections in dark backdrops
Posted by FONDOS PARA FOTÓGRAFOS

At last! Here it is! An article dedicated exclusively to dealing with the issue of reflections in dark backdrops; how reflections are created in dark photographic backdrops and what to do to avoid them. It is incredibly frustrating to see reference images on Instagram and Pinterest, and after having cooked an incredible recipe, take a few photos and find that the photo is nothing like what we had in mind.
In this article we are going to do everything possible to help you take better dark photographs, and for this, we are going to tackle the most complicated issue when working with dark light set ups: the reflections in photographic backdrops.
Table of contents (You can click to go directly to the content)
- Tips on barriers in the creative process
- Why does reflections form on photographic backgrounds?
- How to avoid reflections on photographic backgrounds: 2 lighting schemes for dark food photography.
We are sure that after this article you will be motivated to experiment with a couple of new photography tricks that will make your photography evolve. As you know, our articles are focused on food photography but the content can be extrapolated to other types of photography or even artistic disciplines.
This article is a guide that explains how we use our dark backdrops. Sure there are many other ways to use them. The goal of this article is to offer a simplified way of using our dark backdrops for those who want to get into dark food photography.

1. TIPS ON HOW TO OVERCOME CREATIVE BLOCKS
As an introduction, we would like to say something about the creative process and creative photography. In our experience, a healthy way to approach the creative process lies in the importance of starting to reverse thoughts of the type "this photo is worth nothing."
As we mentioned in our previous post, we propose this learning scheme that can make your photography change radically in a short time.
1. Observe: Learn to observe the work of others. Learn to observe yourself, observing the work of others. The goal here is to learn from ourselves.
What do I love about this photo? Do I like the technique? I love it for what it shows? Is it the style that strikes me so much? The colors? The light? Do I like the person posting the photo more than the photo?
2. Experiment: Learn to experiment freely, but with specific goals and intentions. The objective is to discover what we are capable of doing.
How about I try a different lighting scheme? Color combination? Creative style? Photographic technique? Food styling?
3. Analyze: Learn to analyze your own work, so that you can improve it next time. The goal again is to learn from ourselves.
Did I get what I expected? Does it give me satisfaction or frustration? Have I applied all the techniques available to me? Did I discover something unexpected along the way? Has the work motivated me more or demotivated me?
4. Repeat, repeat, repeat: Learn to be constant and consistent with your creative process. The goal again is to discover what we are capable of doing.
Am I applying a good creative process? Can I do the same faster? Cheaper? With more visual quality? With more consistency between images?


In other words, if you have reached this article it is because you are facing a barrier in your creative process. Specifically, not knowing what to do with the reflections in photographic backdrops.
If this is the first one you face, you have to know that it is only the first of many, many barriers that will come between you and your creative expectations. But do not panic!
Despite what you may have been taught throughout your life, we are all creative, we can all make beautiful things that we are proud of and the most important tools in creativity are neither the hand to draw, nor the intelligence to invent, nor any of that. If you want to know what they are, read on!
The most important tools in creative photography are motivation, perseverance, patience, the ability to be a critical person without being self-destructive, to share with others and to learn from others. As well as many other things that have much more to do with our personal development.
These are the true weapons to be able to face any type of creative block that is presented to you in your food photography. Creative expectations must be kept in check and taken as long-term goals. Under these premises, let's start working!
If you prefer, at this point you can jump straight to the 2 lighting schemes for dark food photography, or continue learning about glows in photography backdrops.
2. WHY DO REFLECTIONS FORM IN PHOTOGRAPHY BACKROPS?
As you may already know, the high quality photo backdrops that we produce have several characteristics that make them ideal for food and product photography, for both amateur and professional use. They are backdrops of great photographic realism, they are smooth backdrops, resistant, flexible backdrops, they can be cleaned after use and can be stored rolled up, remaining flat after removing them from the tube.
Well, despite all the advantages our backdrops offer, our backdrops have their limitations. And these are the limitations of light. That is why we always advise that using dark backdrops is more difficult than using medium or even light backdrops. Learning about light and lighting can be complex.
Nowadays, there is a ton of information and you could really end up walking into a hole like Alicia's and spending many hours watching videos and reading posts, and end up not taking a single correct photo. It's the last thing we want to happen to you.
Regarding the reflections, it should be said that backdrop reflections are very distracting and in professional photography you always try to obtain a even light with soft gradients. Now, to the key question: Why do I get an ugly reflection in the backdrop?


The brightness depends on the relationship between the direction of the light source and the position of the camera. We call this a lighting scheme or set up and it's just that simple. If you want to avoid reflections, you can either block the light (as in the case above), move the position of the camera or move the light source.
And the other key question of this article: why do my photos look good, except for the ones I take with my dark backdrops? Dark photography backdrops emite more reflections, but as we will see in the next point, this can be avoided perfectly well.
That said, there are ingredients that just don't work with certain recipes. If a lighting scheme makes your photography backdrop shine, we can also recommend using another lighting scheme or another backdrop.
At least for us, it's that simple. So in the next point we are going to concisely explain some light schemes that we use to easily get rid of reflections on dark backdrops. Of course, we are only going to explain what refers to light. To get a professionally looking food photo, you will also need professional art direction and styling. We will cover that part in another article.
3. HOW TO AVOID REFLECTIONS IN DARK PHOTOGRAPHIC BACKDROPS?


Now that we have established that the brightness depends on the direction of the light and the position of the camera, we are going to explain different light schemes that will help you to take spectacular food photos in an easy way. The same schemes are valid for photography with natural or continuous light, as well as with flash.
Specifically, dark backdrops are used for the photographic styles dark and moody, or dark and bright. If you post on Instagram the hashta #darkfoodphotography you can find many references of dark food photography. The references are in English due to the volume of professional photographers advertising in English as opposed to other languages.
Dark and moody is really a modern concept, but you can take a look at these dark lighting concepts if you don't already know them: chiaroscuro and Rembrandt lighting. Maybe you will come across things that inspire you out there as well.
These photos are dark because the light has been blocked, in a natural or intentional way. Basically, to take a good dark photograph you have to learn how to block light correctly. The key to dark photography is in the light!
To get a good dark photograph you will need the following materials
- A dark photo backdrop for the base of the scene. You can go to our collection of dark backdrops and choose yours if you don't have one in your photo background collection yet!

- Dark Props and Tableware to draw attention to the food we want to highlight. This is the easiest option to highlight the main subject. However, more complex styling can also be done by combining dark backdrops and light props. Just be warned that it is more difficult, as you will have to better control the scene weights and also the light exposures in the camera. If you are just starting out, it is better to use only dark props.


- *** ESSENTIAL AND WILL CHANGE YOUR LIFE *** Black foam board to block the light. Blocking light is essential in dark photography. And you really learn a lot about light by working with black foam board. They are relatively cheap. We recommend buying several of various sizes. We have many in A2, A3, A4 and even a few smaller ones in A5.


- White foam board to reflect light. We use it a lot because no matter how good the camera you use is and you can recover the shadows in editing, we are of the theory that it is better to take the image on camera as close as possible to how you want the final image to be. And in food photography, we always want the food to look good, so when we have our scene and our photo ready, we go to the end and give it some fill of light with a white foam board. Sometimes it is even essential.


- *** OPTIONAL *** A large white foldable diffuser to diffuse the light. This is a broad topic that we will cover in another article, but basically the diffuser will convert whatever light source you have. It makes the light change in two ways, and this is super important.
1. Makes the light softer.
2. Makes the light whiter. In other words, it tends to correct the white balance (not always, but almost)
Some examples of situations in which to use it:
- If it is a sunny day and you put this diffuser on the window, you will have a great study light.
- If you want to take a photo with flash and your ceilings are very low and you are in a small space, this diffuser will save your life.
- If you want to switch quickly between hard light and soft light with flash
And a long etc of situations where this diffuser is going to save the session.

- And of course, follow a lighting scheme, which means correctly placing all the above elements
Since we have seen the materials that you will need, let's jump directly to the fun bit! The lighting schemes that will get you started posting amazing dark food photos!
2 LIGHTING SCHEMES FOR DARK PHOTOGRAPH
The dynamics we have used is very simple and you will immediately see the good results it will give you.
You just have to follow 3 steps:
- After setting up the scene and with the camera on the tripod, shoot a photo with your light source unchanged.
- Take the black foam boards and block the light until the glare disappears.
- Take a white foam board and fill in the shadows.
This is basically what is going to make your reflections and highlights disappear once and for all. Just play around with the modifiers, blocking and reflecting light, and learn how light behaves while you do it.

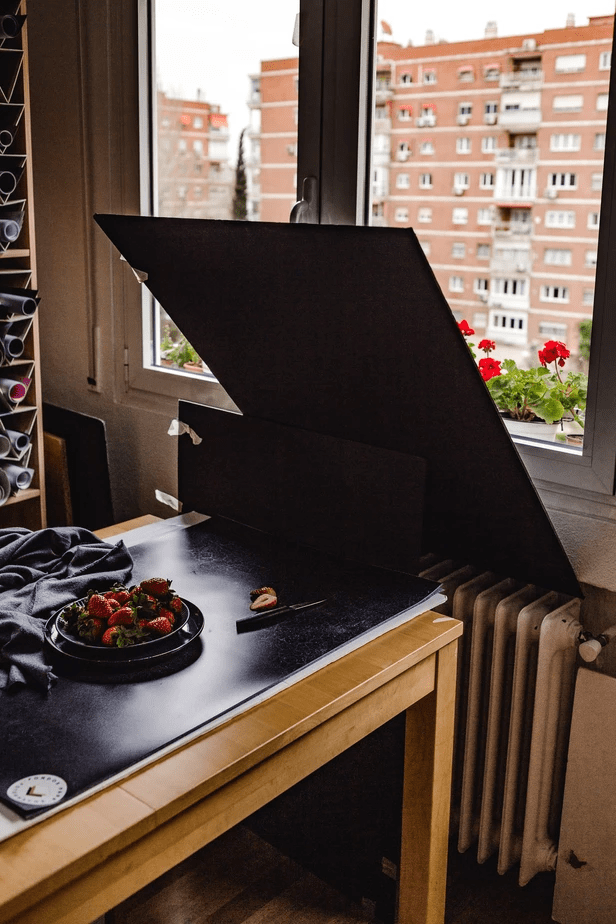
Now we are going to show how we do it. In no way do we want to establish that this is the best way to do it, or the right way, or anything like that. These are tips that are only meant to unlock the ones stuck with the dark light theme and dark backdrops, by showing our work process.
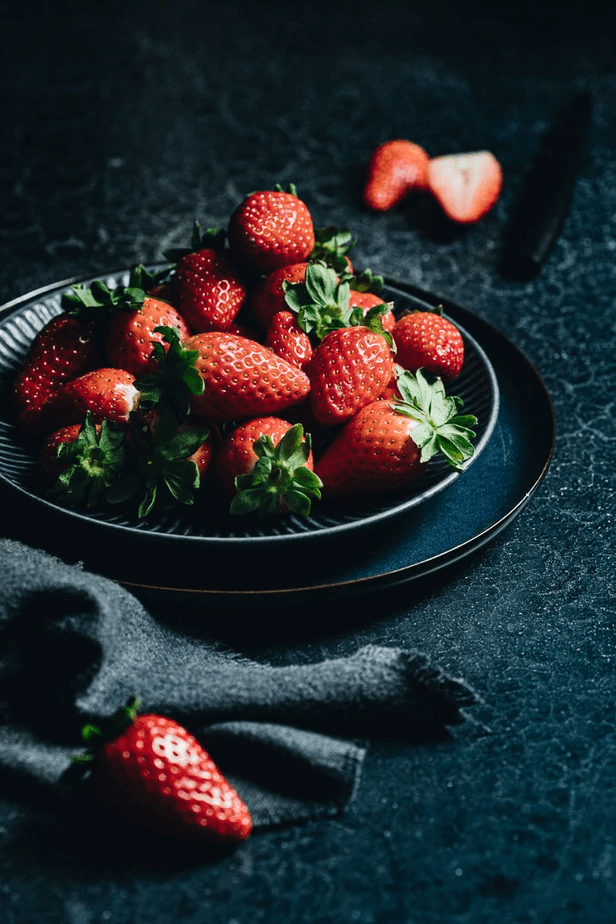
1. SIDE LIGHTING for dark food photography. This scheme is great for highlighting volumes. It is simple and very effective.


As you can see, the first photo has a strong reflection on the surface of the backdrop and in the second photo it has disappeared, using only a black foam board. If you look closely, the backdrop is not perfectly aligned at 90º with the window. This is essential. You will have to look for the direction of the light until you find that point where you can get rid of the reflection in the backdrop using only a foam board. This is how you will achieve a simple and effective side light.


In the following images we have used the black foam board to generate a diagonal shadow at the bottom of the image, then at the top, and then an image with very subtle top and bottom shadows. All this is possible only by playing with the position of the black foam boards. Diagonally, closer, further. Only one. Two. Etc.


The key is to play with blocking the light to get what we want. If you look at Instagram, most of the photos will be overhead shots and will have side lighting. So with this scheme you can get closer to that image you are looking for.
In the following lighting scheme we are going to deal with the mythical backlight. We hope you liked the side light and use it a lot in your next food photo shoots.
2. BACKLIGHT for dark food photography. This scheme is great for overhead shots to have a little more magic. At least that's how we see it. This is all very subjective.


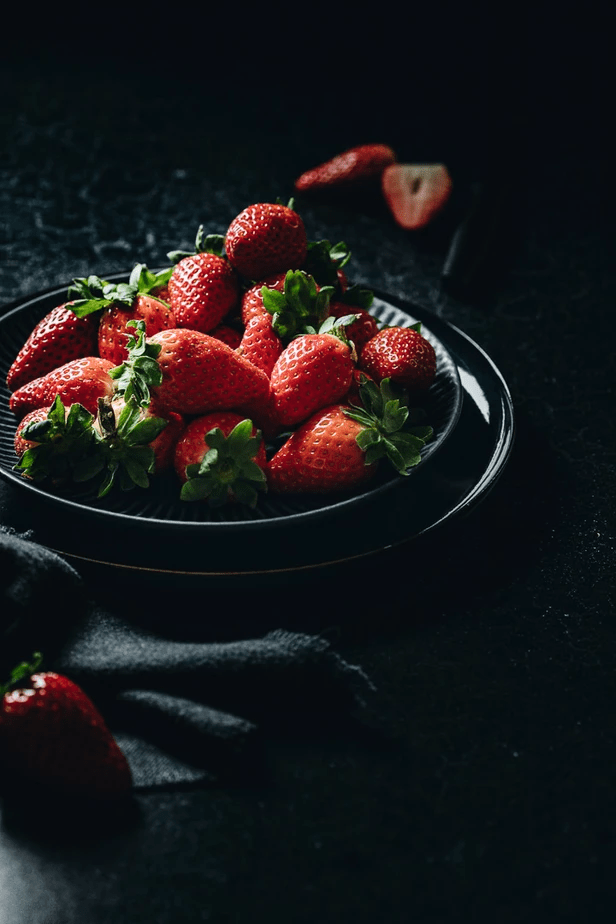
In this case, the shadow falls downward in the overhead shot. This time the white foam board plays an important role since we have tilted the black foam board over the subject to get that diagonal shadow. Which makes everything a little darker and we need bounced light to fill in the shadows a bit.


The difference between the second and third photos is only the position of the black foam board. It's that simple to completely change the aesthetics of the photo. In the third photo we managed to focus attention on the strawberries thanks to the fact that we have killed the reflections and excess light. By blocking the light, it has become a photograph that encompasses more mystery. It's now more dark & moody


Using the same lighting scheme we have taken the camera and shot another photo at 45º against the main light source. In this series, this angle is not the one that convinces us the most, but again, it is a matter of changing a few elements and trying again. For example, if we want the background to be seen more, we can put the white foam board closer to bounce more light. Another solution would be to use a lighter backdrop and test the same scene with the same light scheme with that backdrop.


WHY HAVE I TRIED THIS AND IT IS NOT THE SAME AS YOU?
Everything affects the light. If our scheme has not worked for you exactly the way it has in our case, it is normal. Therefore, all you have to remember are the three steps to take dark food photographs:
- After setting up the scene and with the camera on the tripod, shoot a photo with your light source unchanged.
- Take the black foam boards and block the light until the glare disappears.
- Take a white foam board and fill in the shadows.
- The light from our main light source
We have done the whole session on a cloudy day. With which the light was ideal. One option you have is to wait until it is cloudy and take dark photos that day. Another option is to diffuse the light with a diffuser, just as you would with flash light.
- The window
Window size and orientation can also play a big factor in light. You can try another window in the house and see if the photo changes.
- The roof
Our ceiling is very low. The cloudy day and the fact that the light enters on a downward diagonal helps it not reflect much light on the ceiling and fill the scene too much. However, because it is a very low ceiling, something always fills in. If you have higher ceilings your image will look darker.
- Editing the photos
Obviously these images are edited to get the best out of the light and the scene. We have made an edit that for us is very simple with Lightroom. Basically our goal in editing has been to try to highlight the strawberries and the backdrop and that the shadows have interesting gradients. We recommend you take a look at the radial filter tool in Lightroom. Basically, you can make a pretty fuzzy circle that differentiates the exposure from inside and outside of the circle. In this case, we have used a circle to lower the exposure of the background and another to raise the exposure of the strawberries. Something very simple and tremendously effective.


And those may be some of the reasons why your photo is not the same as ours. Anyways, the idea of "